Showing posts with label craft. Show all posts

7/29/2010

Craft: Waterfall Card Tutorial

The other day I was so surprised to get this awesome card in the mail from a reader named Lisa! Thank you Lisa! I have not seen one made this way and am on a mission to get some made this week.
It is called a "Water Fall" card.
She took pictures that I had posted and made them into 2x2 squares and printed them in a 4x6 picture.

When you pull the little tab at the bottom, the entire thing pulls down and flips through all the pictures! It is darling!
This is a little video that if you are like me and need to see pictures, explains it very well!

6/23/2010

Look how cool these turned out!

As we were running out the door to church on Father's Day I realized that I should probably be bringing a Father's Day gift to all the men at church who are important to our family, Sunday school teacher's, home teachers, Bishop, etc.

So I grabbed a few things out my 'stock pile', put them in a bag and decided ribbon wasn't going to cut it for men! Tucker had some leather left over from a scout project so I used that to tie them together. I thought they turned out really cool looking.

Now this is the part where if your husband got one of these.... quit reading now! No really, come back tomorrow!

Hopefully it's not too tacky to tell you they cost me almost nothing! Hey, the time it takes me to shop and cut coupons is worth something. The packet of marinade was free when my coupons doubled at Kroger, the grilling spice was free with a doubled coupon and the A-1 was .08 cents with the $2.00 off coupon that came out last week. The Lowry's bottle was .79 cents with coupons combined with a store sale.

I am not sure how I feel about giving away things that I got for free as gifts, is it the thought that counts?? You should have seen the piles of makeup and body lotions I gave away at Christmas to neighbors, kids teachers, and coaches. They were really cool gifts but I was really unsure if it was tacky that I had gotten it all free because of coupons and sales.... I wouldn't tell anyone that it was free, but I knew :) So what do you think, is it o.k. to give away free stuff as gifts??

Photobucket

* Today is the last day to sign up for the giveaway!

6/03/2010

Teacher's Gift Idea

This might be a little late for some, but I thought I would share because I think it turned out really cute!

I painted about 1/3 of the classes hands and randomly placed them on the pot. Next, I took the rest of the class and did their thumbprints in yellow. I wrote their names next to their prints. When I got home I painted the yellow thumbprints into bumble bees and painted their names in black. I decorated the rim and painted, "Thank you Mrs. Varnum for helping us bloom and grow." around the rim.

Now, I glazed and fired mine in my kiln so it was all shiny and pretty so if you don't have a kiln handy ( like in your back pocket!) you could use a terra cotta pot and regular paint, like tole paint. I think you would need to seal/poly it with something to protect it.
Twelve hours later when it came out of the kiln, I planted a little herb garden with basil, rosemary and cilantro.
I wish I would have made these for Mother's Day for the Grandmother's, they turned out really cute and are something a little useful. I obviously would have used my kids handprints, maybe the dog and cats if I could have held them down :)

I only did the herb garden for the classroom that I was room Mom. All the kids are taking chocolate to their own teachers and bus drivers. It is all getting a little out of control everyone that we have to give something to at the end of the year. With 4 kids in school I had 16 different end of the year thank you's to hand out.

Do you give out thank you's at the end of the year? What do you usually give?

4/26/2010

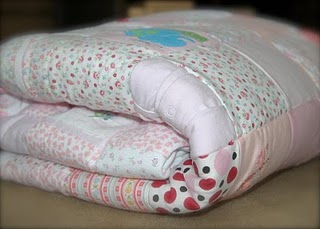
Guest Post: Great Idea for a Baby Quilt!

I have followed a little bit what Emily over at The Crafty Mrs. V. was doing over at her blog, making a baby blanket.

Not only is this a beautiful baby blanket, but in my mind it is almost a memory scrap book blanket. The reason why I love it so much is that she and I have many of the same baby clothes! Emily took pieces of her babies onesies and other outfits, cut them down, and pieced together this gorgeous blanket!

So many times I am sick over giving away a baby outfit that I just don't have room for anymore or throwing one away because of a stain, I think this may have solved that problem. I might be cutting a piece from each one now and saving them until I can put it together into a quilt!

Thanks Emily!
Photobucket

3/30/2010

Easy Easter Craft-Bunny (repost)


I can't remember where I first saw these but it was years ago. At least 15 because I have been making them that long. I love them because they are cheap and the kids can make them. You non-crafty types (me included) YOU can make these in under 23 seconds, thats the record!
Take a cheap hand towel, I like white. The cheaper and thinner the better. They have them in packs at Wal-Mart for like 10 for $6
Fold one corner up like you are making a bandana.
Keep folding...
When it is all rolled up, fold it in half.
Next, now this is the hardest part, take the open ends (the ears) and fold it back almost half way. This is making the bunny face and ears.
Take a rubber band and secure the little face of the bunny. I had to use a hair tie because I used a heavier wash cloth, the thinner clothes can be done with a rubber band. Twist it around a few times so it is tight. Now pull the ears up a bit, and your done!
Tie a ribbon around the rubber band so you can't see it.
If I had all the supplies I usually give him some googly eyes, a little pompom nose and a little pompom tail. But I didn't want to pull out the glue gun. I think he is cute as it!
I stick a plastic egg in the little hole behind his ears, it is a perfect spot to hold something. I am using these as name sign for Easter dinner. I am putting everyones names on the eggs and putting a bunny by every plate. 
They are cute and less than $1 each to make. Can you beat the 23 second record?? 

What traditions do you have for Easter?

Photobucket

3/04/2010

Altered art clip board and notebook set


I am reposting this one for a reader who was looking for it!

For a Women's activity at my church I was given the assignment to come up with a decorated clipboard. I never get the time or would have taken the time on my own to play around with any crafts right now, so I guess I should be thankful it was an assignment, that meant I HAD to do it :) Right?
I started with a regular composition notebook (.50 cents at Walmart) and scrapbooking paper. I traced the cover and back and cut to match the size of the cover.
I did the same for the back and front of the clip board. I used a coordinating paper for the backs of the clip boards.
Next, I glued the paper to the notebook covers.
For the front of the clipboard I made a template so I could cut around the clip part and fit the paper in nicely.
It was late and I thought I had modge podge (I spelled that wrong didn't I?) but I was out. So I watered down white Elmer's glue and it worked perfectly.
I coated the backside of the clipboard with a thin layer and placed the paper on top. When it was dry I did the front side. When that was dry I did a think layer over the top of the paper to help seal it down. It only takes about 20 minutes to dry.
While watching a movie with my husband, I trashed my living room floor with scrapbooking supplies to embellish the covers. We were watching Juno, I hadn't seen it before, it was a cute movie.
This is one set when done! The little book in the left hand corner is a little post it note embelished book. I used velcro on the cover to hold it closed. It turned out really cute! The directions to make one are HERE.
This set has a smaller clipboard with buttons. I like the bigger clipboards better but I wanted other to have options, thats always fun isn't it!

What was the last crafty thing you made?


Photobucket

2/11/2010

Valentines Day Frugal Food and Crafts!

There are some really awesome Valentines Day food and crafts out there on the web. These are a few of my favorites!

The girls over at Our Best Bites have an amazing tutorial on how to make Valentines Day fortune Cookies.

Photo: Our Best Bites

I plan on trying these this year as long as it continues to rain and we are stuck inside. Her directions are very easy and I think I can tackle this one!

I know this is cheesy, but we just had a long converstion at work about how bad our handwriting has gotten because we don't write anything any more. It is all typed. I can't tell you how much I LOVE to get a handwritten letter in the mail. It is so much more fun to read! When I look at my Grandmothers handwritting I am sad that I never took the time to make it as beautiful as hers, it really is an art.
I plan taking Friday night to write lvoe letters to my family, I want to do them on nice cards or paper, it might be cheesy and inexpensive but my time is worth more than anything else I have!
HERE is a good tutorial on how to write a Love Letter, or at least some ideas to get you started!

Photo credit: Taste of Home
Back when cookies boquets were really popular, I made a few because I couldn't bring my self to spend the $60 that they cost. I made mine for about $20 and they turned out beautiful!
I would like to make 2 this year, one for each of the older women, who are both widows, that live on either side of us. I will enlist the kids to help for sure they love this kind of thing. Wish me luck!
I personally liked this chocolate cookies recipe and they have good directions!

My girls and I made these last year for our neighbors. I happened to have everything on hand so they were a sinch. Even the little fingers of my 5 year old was able to do this one.
The directions are HERE.

Do you have any great food or craft ideas?
Photobucket

1/20/2010

Girl Birthday Party Ideas ~ Webkinz

This is a REPOST from last spring, another friend and I were talking about ideas for parties so I told her I would repost it...

My dear friend had a fabulous idea for a little girls birthday party. Like all elementary school age children, her daughter and all of my girls are really into Webkinz. The little stuffed animals that you can register on line and play with.

She sent out darling little invitations that asked the girls to bring any Webkinz they had, if they didn't have one the Birthday girl has one they could borrow.

Ahead of time my friend Kelly, sewed "beds" for the Webkinz out of fleece and tassel's she found at Walmart. She didn't finish them completely so the girls could work on them. Each girl picked her colors and Kelly showed them how to stuff them with batting and whip stitch them closed. A BIG hit with 8 year old girls! This is my daughter's below, she sleeps with it and her Webkinz. They played games with the Webkinz and Kelly set up her computer to their T.V. so that it had a big screen where all the girls could see. They went to the Webkinz website and let all the girls show each other their pets online. Another BIG hit!
I was able to make Adi her cake and I think it turned out cute! This is the back, I added the Webkinz "tag" on the frog's rear end! Kelly bought a large cookie cake from Sam's for the base.
I used the Wilton teddy bear cake pan as a mold and used a heavy pound cake batter.
Next, I cut and shaped the teddy bear into a frog shape with a narrower nose. I used extra thick buttercream frosting to build up the back part of the frog to give him his "frog" shape. I decorated him on the cookie so I didn't have to move him later. I made the lilly pad he is sitting on out of frosting but next time might do it out of colored chocolate. I think it turned out cute and looked just like her Webkinz!
My daughter LOVED this party and talks about it to this day.

With 6 kids I have a lot of parties to do. My kids only get a "friend" party on their even birthday's. They get a family one every year. So they spend a good deal of time trying to think of exactly what they want to do. I also usually only have them at home as I refuse to pay the enormous amount party places charge. I have found the parties at home to be more fun for the kids although more work for me!

What have been you kids favorite birthday party ideas and theme's? What was a success and what didn't work out so well?!

1/06/2010

Tutorial for the "Envelope System"


If it is your goal to get organized, specifically your coupons this year, check out this blog! Kelleigh has made the most beautiful envelops for her cash system and coupons. 


There are many different ways to organize your coupons. I personally use the binder method. But, many people use an envelope system. They pull out the coupons they need for a specific sale or store and keep them in an envelope in their car or purse. 


You know what's so cool? Kelleigh isn't selling her envelope system (though I really think she ought to!), instead she generously posted the complete tutorial and template here so you can create your own. (Thanks Money Saving Mom.)


Check back on Monday, I am going to break down my coupon binder for you. Show you what all my tabs are and list all the best, and cheapest places to find all the items you will need to make your own binder! Plus, I will be giving one away...
Photobucket

12/10/2009

Easy Easter Craft-Bunny

I can't remember where I first saw these but it was years ago. At least 15 because I have been making them that long. I love them because they are cheap and the kids can make them. You non-crafty types (me included) YOU can make these in under 23 seconds, thats the record!
Take a cheap hand towel, I like white. The cheaper and thinner the better. They have them in packs at Wal-Mart for like 10 for $6
Fold one corner up like you are making a bandana.
Keep folding...
When it is all rolled up, fold it in half.
Next, now this is the hardest part, take the open ends (the ears) and fold it back almost half way. This is making the bunny face and ears.
Take a rubber band and secure the little face of the bunny. I had to use a hair tie because I used a heavier wash cloth, the thinner clothes can be done with a rubber band. Twist it around a few times so it is tight. Now pull the ears up a bit, and your done!
Tie a ribbon around the rubber band so you can't see it.
If I had all the supplies I usually give him some googly eyes, a little pompom nose and a little pompom tail. But I didn't want to pull out the glue gun. I think he is cute as it!
I stick a plastic egg in the little hole behind his ears, it is a perfect spot to hold something. I am using these as name sign for Easter dinner. I am putting everyones names on the eggs and putting a bunny by every plate. 
They are cute and less than $1 each to make. Can you beat the 23 second record?? 

What traditions do you have for Easter?

10/17/2009

Easy Halloween crafts!

Thanks to Utah Deal Diva for these great Halloween ideas!
We go through a lot of milk, so when a holiday is approaching, I start saving the jugs and scouring the internet for some fun crafts. Here are a few I’ve found for Halloween:

Here’s a fun idea that uses a few milk jugs! We saw this Pirate at Thanksgiving Point last weekend. You could just leave the skeleton free of any costume and it would still be fun to display on the porch! Here are the instructions.

My friend Susan had started making these, I saw them at her house and they were soooo cute! They would be so cute lining a walk-way. Easy to make as well- go here to learn how.
This is a Tide bottle! Go here for details on making this little guy.
Want even more ideas? Family Fun magazine has a fantastic collection of crafts for young children. You can also go here
Photobucket